Monday, October 30, 2017

Winterizing the Garden


As fall winds down the plants are soaking up the last few days of sunshine and warm weather to hold them through the cold Pacific Northwest winter. So far to prepare the garden for winter Catherine and I have harvested all the dry green beans and took down the stalks, harvested the horseradish, radishes and green onion, mixed coffee in the blueberry pots and turned the compost bins. Although, we still have quite the list of chores to complete before the first freeze and intense rain arrive.

One concern for the winter is our empty above ground garden beds. As the weather becomes worse the soil will become compacted and lose nutrients if not protected or regularly turned. One method to combat this common PNW problem is using ground covers. Ground covers work by providing the soil protection from the rain and freezing weather as well as reintroducing nutrients to the soil and giving a little bit of life back to the garden. For the type of weather experienced here in Washington, it is important the ground cover plant does not need regular sunshine and can handle large amounts of rain and cold weather. A few plants that are ideal for this are: Hydrocotyle sieboldii commonly known as creeping crystal, Soleirolia solerolii also known as Baby's Tears and Mentha requienii also called Corsican Mint. These are only a few examples of the many ground cover plants that can handle the damp and shady PNW winter weather. These will be planted in the bins that previously held green beans, radishes, kale and onions. Ground cover plants will also fend off weeds over the winter so when we pull up the ground cover the soil will be perfectly ready for new plants.

Another project will be creating mulch for the grapes and kiwi plants as well as protecting the strawberries from the weather. To create a mulch for the grapes and kiwi Catherine and I will be gathering bags of leaves that may otherwise suffocate the plants they fall on to shred that will then be mixed into the soil around the roots of the plants. As for the strawberries they needs a thick layer of straw around the base of each plant to protect them from freezing. Oat, rye and wheat straw are best to be used as they are not heavy and won't smother the plants.

Finally, to get a head start on spring projects we are going to work on weed prevention. As our garden is organic we do not use pesticides and weed killer. Instead, we will be placing cardboard over the weeds that cover the pathways between planter boxes and cover that with bark. As the cardboard decomposes it will smother the weeds beneath and create new paths that are weed free. Giving our garden a nice and tidy look. This will be one of more labor intensive projects but will be worth the work when spring rolls around and we can focus all our attention on new plants and starts instead of weeding for two weeks to prepare.

Hope everyone has a beautiful pacific northwest day and found some use in this blog post about how to winterize your garden!


Monday, October 16, 2017

Horseradish Galore

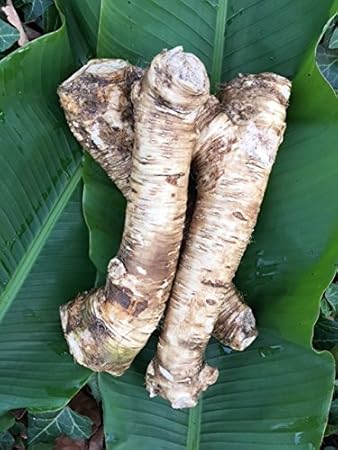
With the colder fall days approaching, Catherine and I have begun winterizing the garden and harvesting all of the late fall crops. Last Friday was dedicated to harvesting the immense amount of horseradish that had been planted in the spring. As I have never worked with horseradish before I was unsure of how to harvest it and what to do with it after. So here is a fun little tutorial for all the horseradish lovers out there!


Harvesting horseradish is a lot of work. The roots (the part that is actually used) are very brittle and break easily so it is important to be careful when digging them out. The best way to go about harvesting is to use a small shovel to loosen the dirt around the base of the plants and to pinpoint each of the roots. Removing the leaves from the plant proved to be helpful as there was nothing in the way when I began to dig out the roots (I later turned these into a green mulch for the planter boxes that will be empty for the winter). In general, roots about the size of your thumb or larger are the ones you will want to keep. Horseradish roots grow out horizontally under the soil instead of vertically down which makes them easier to pinpoint. How I went about harvesting the large roots was after pinpointing them I followed them and cleared the dirt around it until I found where the root divided into smaller ones that could not be used and broke it off there. I would then go back and pull out the smaller roots which ultimately went in the compost bin. Harvested roots can also be replanted as it will grow back more for next season.

After all your horseradish is harvested clean it all and lay it out to dry. It is best to then cut it into smaller pieces and if you choose to store it place it in a sealed bag in the freezer. Frozen, horseradish will be good for 4-6 months. But, it can also be used fresh. Grated horseradish can be added to a variety of things from hummus to sandwiches wraps or used to make a fresh sauce. Below is a recipe for a horseradish sauce made using freshly harvested roots. It also has many naturopathic home remedies. Horseradish has been known to clear sinuses in the same way a spicy food would when eaten, making it a commonly used remedy for sinus infections that is safe for longterm use. It has also been used for alleviating arthritis and nerve irritation. So, despite horseradish being a taste not favored by all it can be a very helpful addition to your medicine cabinet.
Image result for horseradish plant


Recipe:
    1. 1 cup sour cream.
    2. 1/4 cup grated fresh horseradish.
    3. 1 tablespoon Dijon mustard.
    4. 1 teaspoon white wine vinegar.
    5. 1/2 teaspoon kosher salt.
    6. 1/4 teaspoon freshly ground black pepper.

Monday, October 9, 2017

Ivy, Ivy Everywhere

Thus far, we have been harvesting the scallops, potatoes and beans, kale and herbs. The little greens in the middle planter box have been thinned. Kennedy and I have better defined the raspberry border and Kennedy has weeded a definite space around the strawberries. The OIKOS students have planted garlic in the potato bed. We'll likely get garlic and  potatoes in that bed next spring. I've never combined those two before, so this'll be interesting. I wonder if I won't have to add garlic to my mashed potatoes... More gleaning and weeding are to come.

Potato bed with garlic hiding

I dug a shallow trench around these raspberries, lined it with landscaping fabric and filled it with rocks.
That should keep the weeds out long-term.
Edward the mole's work

The plants are starting to wind down for the winter. Stubborn beans are putting out their last vibrant flowers. The blueberry leaves are burning to a dull red color and the spent raspberry stalks are beginning to yellow in earnest. The season-old kale drooping over the planter box reminds me of an old woman sitting on her rickety front porch soaking in the afternoon sun. Only the hardy bumblebees and the occasional hurried honeybee are visiting the last flowers. Hummingbird chattering is seldom, while caws and dark crow shadows circling the compost pile are more frequent. Things are still green, just less so. The garden is putting forth its last effort before it goes to sleep once more. 

However, one plant is doing just fine. And it'll continue as green as always through the winter. Hedera helix, or English ivy, has been planted around campus as a ground cover and has been doing a wonderful job in that department. So wonderful, in fact, that it's beginning to cover the ground around the planter boxes. It's already been cleared far enough away from the boxes for the time being (thank you OIKOS!), but we will undoubtedly need to clear it again this year.

OIKOS cleared the ivy last week. There was a bush in there!
For those who may be unfamiliar, English ivy is a dark green vine with extremely aggressive growth. If left unchecked, ivy can surround flat ground, buildings, old cars and even whole trees. The plant spreads vegetatively at a remarkable rate and colonizes far away places with berries that entice local birds like robins and waxwings. Sometimes even light amounts of herbicide can just drip off the waxy coating on the leaves. The plant itself is mildly poisonous when ingested. In Washington, it is a Class C invasive species, so while it is recognized as invasive, it is perfectly legal to plant it as a ground cover.

Berries at various ripening stages.

The ivy next to the garden is producing a second batch of flowers. At first I only saw paper wasps pollinating them, but now I've been seeing native wasps, hoverflies and the occasional bee.


As a botanist, I find English ivy's success rate fascinating. But as a Pacific Northwest native plant specialist, I also find it alarming. The plant can tolerate a variety of conditions, but it prefers moist soil and part to full shade. Sounds a lot like your average western Washington forest. Sections of the woods next to campus are suffering due to this invasive non-native. It is slowly replacing small plants on the forest floor, like tellima and salal. The ivy is creeping up the Douglas firs, trees that would not tolerate the shade of the vines well. The invasion has not progressed very far as of yet, but eventually large sections of ivy will need to be removed.
Long-term English ivy infestation on big leaf maple and Douglas fir on a Pacific Northwest roadside.

The best method of removing it would be to pull it out manually. You cut the above-ground growth part-way and then pull out the rest with the roots, which are fairly shallow. The vines are tough, tougher than your hands, so gloves are advised. Also of note is the occasional allergic reaction, which will show up as red patches or mild blistering on the skin. Removing English ivy from trees is also a simple process. You cut about 2-3 feet of the ivy from all the way around the trunk. The vines will have embedded themselves into the bark, so you may need a screwdriver to remove them from rough bark. Old vines can become firm like wood, so a small saw may be required to cut them. (In the bio lounge in Old Main, there is a sample of how wood-like the ivy stems can get on older vines.) Pulling out English ivy by hand is a lot of hard work, but it is a simpler process than removing Eurasian milfoil, purple loosestrife or even vinca.
The ivy left on the tree will die off in the coming weeks. Leaves will brown and fall, allowing sunlight to reach the tree branches. The stems will rot more slowly. The ivy in this picture was just cut.
The ivy on the west side of the garden will be a continuous battle. But periodic removal should keep it from interfering with our lovely little plants.